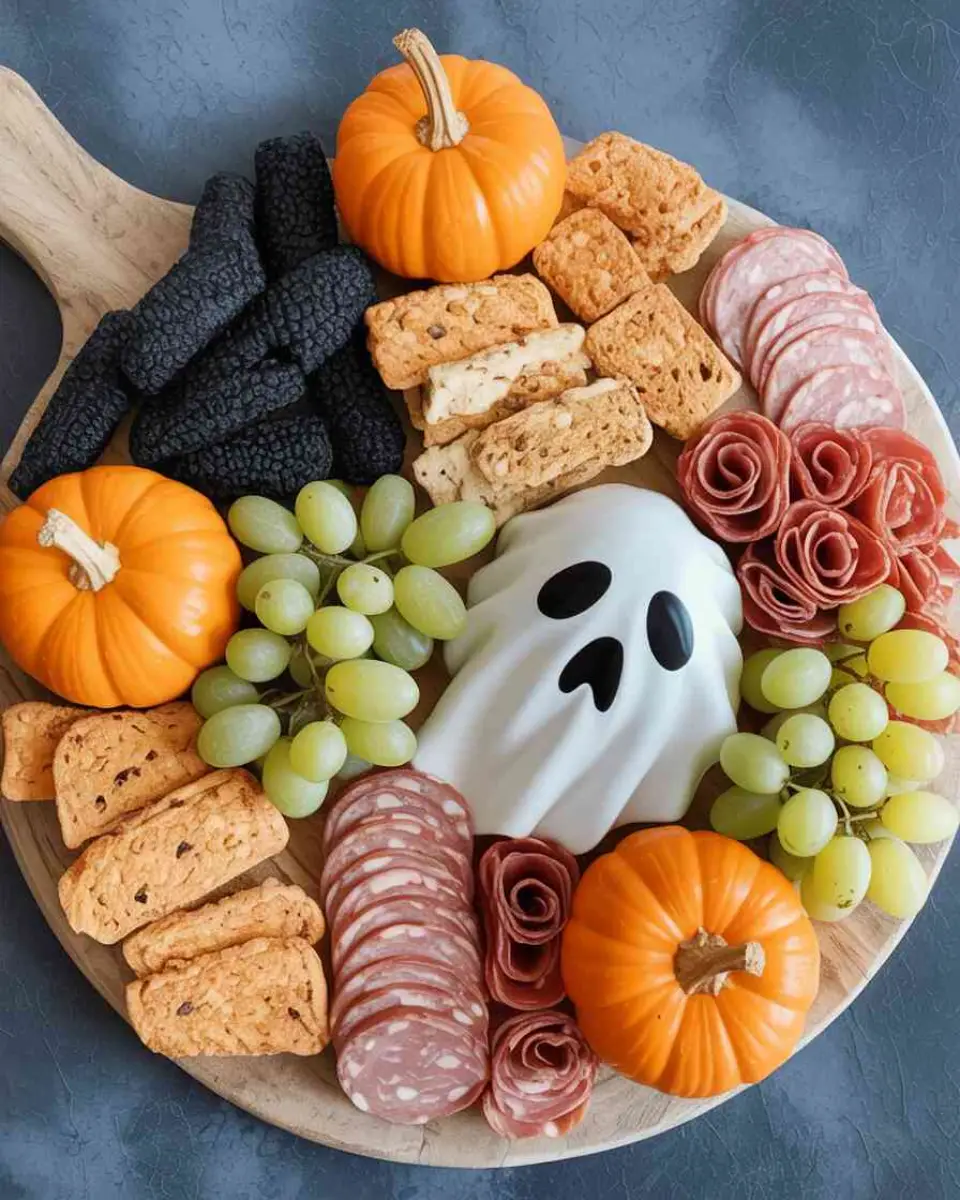
Halloween charcuterie board setups are a festive, fun way to entertain guests with spooky snacks and seasonal flair. From eerie cheeses to creepy-crawly candies, this themed grazing board becomes the centerpiece of any gathering. In this guide, you’ll find ideas for ingredients, creative styling tips, and spooky touches that turn a regular board into something truly haunting. Whether you’re hosting a children’s costume party, an adults-only cocktail night, or a cozy movie marathon, this setup delivers serious wow factor. We’ll show you what to include, how to style it spookily, and prep tips to save time.
My Halloween Memory + Why I Love Making a Halloween Charcuterie Board
Childhood Traditions with a Spooky Twist
Growing up, Halloween was one of my favorite times of year. The thrill of dressing up, the crunch of leaves underfoot, and the joy of sneaking one more mini candy bar after trick-or-treating are moments I still hold dear. But one memory that sticks out most is my mom’s Halloween spread complete with a spooky-themed cheese board. She’d always arrange things like black olives to look like spiders, use cheddar shaped like pumpkins, and add tiny cauldrons filled with ranch for dipping. That’s where my love for crafting a Halloween charcuterie board truly began.
As an adult, I’ve made it my own. Every October, I host a small gathering with friends or family and create a spooky snack board centerpiece. Over time, I’ve figured out the best ways to combine both classic charcuterie ingredients and Halloween-themed additions to make something both delicious and delightfully creepy.
Why Halloween Charcuterie Boards Work for Every Crowd
Print
Halloween Charcuterie Board Ideas That Impress Every Time
- Total Time: 20 minutes
- Yield: 10 servings 1x
- Diet: Vegetarian
Description
- Hi there! I’m Emma, the heart and soul behind eastmealstodo.com. From my earliest memories, the kitchen felt like home—warm, creative, and full of tiny moments that turned simple ingredients into magic. A Halloween charcuterie board brings that magic to life: playful shapes, bold colors, and treats that spark smiles. I love mixing classic cheeses with sweet, spooky touches, because the best boards invite everyone to try something new. Whether you’re hosting friends or planning a cozy movie night, this board makes the night feel special. I’ll guide you step by step so you can enjoy the fun and the feast.
Ingredients
- 8 oz brie, wheel (raspberry jam for “bloody” drizzle)
- 8 oz cheddar or gouda, cut into bats/pumpkins
- 6 oz salami or pepperoni (shape into “roses” if desired)
- 4 oz prosciutto (twist into mummy-style ribbons)
- 1 cup grapes (red or black), washed and dried
- 1 cup blackberries or blueberries
- 1/2 cup stuffed green olives (for “eyeballs”)
- 1/3 cup black olives
- 1 cup assorted crackers (charcoal if available)
- 1 cup pretzels or breadsticks (witch “fingers” option)
- 1/2 cup candy eyeballs, gummy worms, or chocolate pumpkins
- 1/3 cup nuts (almonds, cashews, or pistachios)
- Small ramekins: mustard, hummus, chocolate dip
- Optional props: mini pumpkins, plastic spiders, tiny cauldrons
Instructions
- Chill soft cheeses 10 minutes so they slice cleanly; cut cheddar/gouda into bats or pumpkins with small cookie cutters.
- Place the brie first on a dark slate or board; spoon raspberry jam on top for a “bloody” effect; add two olive slices for “eyes” if you like.
- Fan crackers in two areas to frame the board; add a second crunch zone with pretzels or breadsticks.
- Fold prosciutto into loose ribbons (mummy wraps) and curl salami/pepperoni into “roses”; cluster cured meats near crackers.
- Tuck grapes, blackberries, and blueberries into open gaps to add shadowy color and freshness.
- Add olives in small piles or ramekins; use pimento-stuffed olives for eyeball accents on goat cheese rounds, if using.
- Place dips in mini cauldrons or ramekins (mustard, hummus, chocolate); keep sweet items away from savory dips.
- Finish with candy eyeballs, gummy worms, nuts, and a few props (spiders, mini pumpkins) for height and drama.
- Refrigerate, loosely covered, up to 4 hours; remove 20–30 minutes before serving for best texture and flavor.
Notes
- `Make-ahead: Cut cheeses and prep meats earlier in the day; add crackers and candy just before serving to keep them crisp.
- Allergy-friendly swaps: Offer a small gluten-free cracker section and a nut-free zone in separate ramekins.
- Pairings: Serve with sparkling water, apple cider, or a simple red. For kids, add hot cocoa with marshmallow ghosts.
- Leftovers: Use cheeses and meats in sandwiches; add fruits and nuts to salads the next day.
- Keyword tips: Mention “halloween charcuterie board,” “spooky snack board,” and “Halloween appetizer” in your post headings and image alt text.
- Prep Time: 20 minutes
- Cook Time: 0 minutes
- Category: Dessert
- Method: No-Cook
- Cuisine: American
Nutrition
- Serving Size: 1 portion
- Calories: 300
- Sugar: 12 g
- Sodium: 680 mg
- Fat: 18 g
- Saturated Fat: 8 g
- Unsaturated Fat: 9 g
- Trans Fat: 0 g
- Carbohydrates: 22 g
- Fiber: 2 g
- Protein: 14 g
- Cholesterol: 35 mg
Halloween charcuterie boards are incredibly flexible. You can go sweet, savory, or a combination of both. You can lean into terrifyingly realistic themes (like “bloody” raspberry brie) or keep it light and playful with candy corn and gummy worms. There’s also no pressure to be perfect just have fun with it!
These boards are ideal for parties because guests can pick at what they like. Plus, they’re a great way to display seasonal ingredients like figs, cured meats, and festive cheeses. I love how a single board becomes a talking point, a photo opportunity, and a delicious experience all at once.
Want to spice it up even more? Try pairing it with a Halloween-themed cocktail from your bar cart, like the witch’s brew sangria in my Halloween Party Food Ideas post, which goes perfectly with this type of spread.
What to Include on a Halloween Charcuterie Board
Spooky Savory Selections
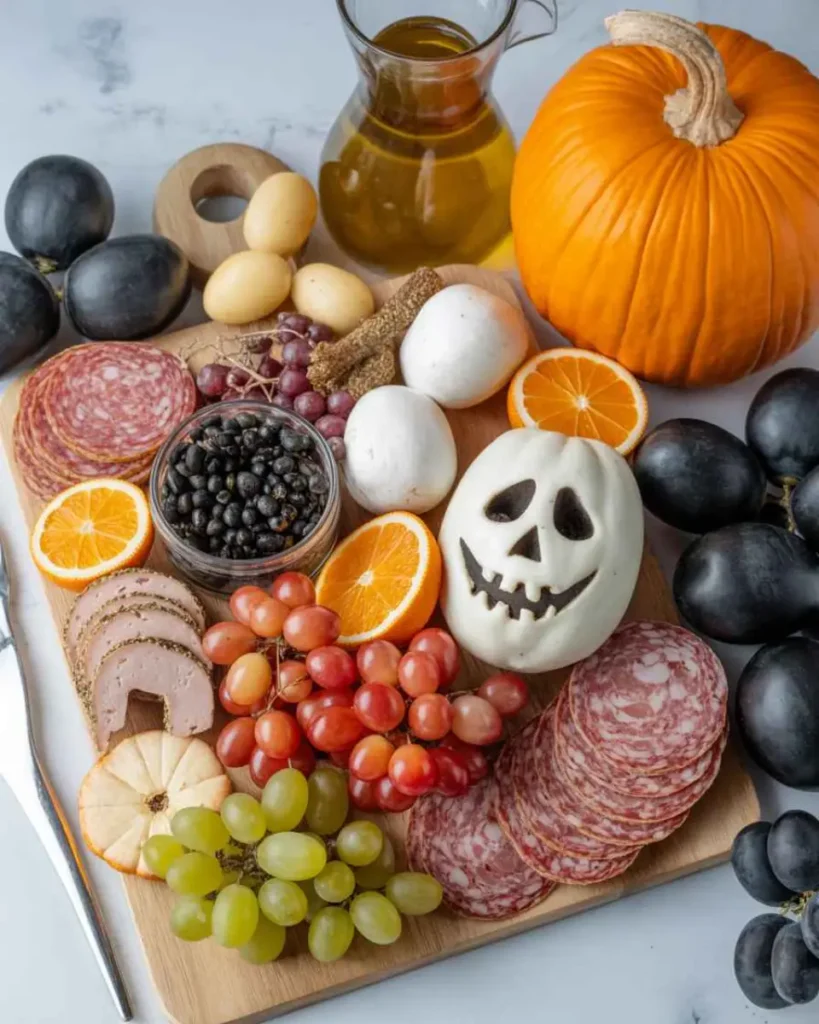
To make the best Halloween charcuterie board, start with the essentials: a mix of cured meats, cheeses, crackers, fruits, and nuts. For a spooky twist, use:
- Prosciutto “intestines”: Twist and fold thin slices for a gory effect.
- Black garlic or black olives: These add rich umami flavor and a deep, dramatic color.
- Cured meats shaped like roses or snakes use small cookie cutters or creative folding techniques.
- Charcoal crackers for dark contrast.
Cheeses can be playful too. Use cookie cutters to create bats and pumpkins from orange cheddar or gouda. You can also serve brie with raspberry jam, which looks deliciously gory when sliced.
I often pull inspiration from this Spooky Halloween Snack Mix recipe that features dark chocolate, dried fruit, and popcorn perfect for filling in empty spots on your board.
Sweet and Seasonal Add-Ins
To balance out the savory, include Halloween sweets:
- Candy eyeballs, candy corn, gummy worms
- Pumpkin-shaped chocolates
- Dried apricots and blood oranges for seasonal flair
Want to make it even more creative? Add mini caramel apples or fill small ramekins with chocolate dip and marshmallow ghosts. You can even label items with Halloween puns like “witch fingers” (pretzel sticks) or “monster toes” (stuffed green olives).
Don’t forget to add color contrast and elevation. Use cake stands or mini cauldrons to give the board some dimension. It’s all about creating layers that feel full and abundant. If you’re short on time, check out my Easy Fall Snack Board many ingredients double beautifully for Halloween.
How to Make Your Halloween Charcuterie Board Spooky
Use Color, Texture, and Contrast for Spooky Appeal

Creating a Halloween charcuterie board that’s spooky is all about drama and detail. Begin with a dark base like a slate or black wooden board to give it a moody foundation. Add layers of rich, eerie hues deep purples, blood reds, charcoals, and ghostly whites. Blackberries, blueberries, and purple grapes create shadows, while pale cheeses and white chocolate skulls bring chilling contrast.
Textures matter, too. Mix slick olives, crumbly aged cheeses, and gooey brie topped with red pepper jelly or “bloody” raspberry jam. Style food into creepy shapes twist prosciutto into mummy wraps or roll goat cheese into eyeball bites with olive centers.
Add finishing touches with props like small pumpkins, black cauldrons filled with dips, or plastic spiders nestled between snacks. These instantly amplify the eerie vibe and make your Halloween charcuterie board a true centerpiece. One of my favorite tricks is inspired by my Creepy Halloween Popcorn Mix, where candy eyeballs peek through dark popcorn a fun garnish you can sprinkle around your spread.
DIY Spooky Additions That Impress
Handmade touches elevate your board. Try monster-teeth apples filled with nut butter and mini marshmallow “teeth,” salami “roses” for a gothic vibe, deviled eggs dyed black or green, or witch’s finger breadsticks with almond “nails.” Label snacks with playful tags like “Goblin Guts” or “Vampire Bites” for a final frightful flair.
To finish, tuck in treats from my Halloween Cookie Board, like ghost-shaped cookies or chocolate-dipped pretzel rods. These eerie accents transform a simple Halloween charcuterie board into an edible centerpiece that sets the tone for your entire celebration.
Make-Ahead Tips for Your Halloween Charcuterie Board
Can You Make a Halloween Charcuterie Board Ahead of Time?
Absolutely. One of the best things about a Halloween charcuterie board is how easy it is to prep in advance. In fact, doing so gives you time to focus on party setup or just enjoy getting into costume. Most meats, cheeses, fruits, and sweets hold up well when assembled a few hours early, and certain items can be prepped even the night before.
Here’s a simple breakdown:
| Item | Prep Time |
|---|---|
| Cheese (cut into shapes) | 1 day before |
| Cured meats | Same day, early |
| Fresh fruit (like grapes or berries) | Same day, 2–4 hours ahead |
| Dry snacks (crackers, pretzels, popcorn) | Up to 1 day before |
| Candy/gummy toppings | Add just before serving |
Cover the assembled board with plastic wrap and refrigerate. For best presentation, remove it 20–30 minutes before serving so cheeses soften and flavors pop.
Get inspired by how I prepped my Fall Snack Board early and kept everything tasting fresh until guests arrived.
Storage Tips & Leftover Ideas
After the party, store leftovers in airtight containers. Most cheeses and meats stay good for 3–4 days in the fridge. You can even repurpose them into sandwiches or toss the fruit and nuts into a salad.
A Halloween charcuterie board doesn’t have to be one-night-only it’s a treat that keeps on giving, especially when you plan ahead smartly.
For more recipes Follow me in Facebook and Pinterest
FAQ: Halloween Charcuterie Board
Q1: What is a Halloween charcuterie board?
A Halloween charcuterie board is a themed snack board filled with spooky, festive foods like meats, cheeses, fruits, candies, and Halloween decorations. It’s designed to be both visually fun and delicious, making it perfect for parties.
Q2: What should I put on a Halloween charcuterie board?
Include a mix of sweet and savory items: cured meats, cheeses cut into spooky shapes, crackers, olives, grapes, candy eyeballs, gummy worms, and Halloween-themed treats like chocolate pumpkins or ghost cookies. Add dips in mini cauldrons or ramekins for extra flair.
Q3: How do you make a Halloween charcuterie board spooky?
Use contrasting colors (black, red, orange, white), spooky props like plastic spiders or skulls, and creepy food styling. Twist meats into “intestines,” drizzle brie with red jam, or shape snacks like ghosts, bats, or monsters for a chilling effect.
Q4: Can I make a Halloween charcuterie board ahead of time?
Yes! Prep meats, cheeses, and most fruits earlier in the day. Dry snacks and candy can be added just before serving. Cover the board with plastic wrap and refrigerate then bring it to room temp 30 minutes before guests arrive.
Conclusion
A well-crafted Halloween charcuterie board is more than just a party snack it’s a conversation starter, a creative outlet, and a delicious way to celebrate the season. Whether you’re stacking gouda pumpkins next to salami roses or adding gummy worms for a frightful finish, your board should reflect your style and the spirit of Halloween.
With the right mix of spooky and savory, you’ll impress your guests without stressing over last-minute prep. And don’t forget, these boards aren’t just for parties they’re perfect for cozy nights in too. Let your imagination run wild, prep smart, and watch your Halloween snack table become the life (or afterlife) of the party.
For more fun ideas like this, check out my Spooky Halloween Snack Mix or build out your theme with a Fall-Inspired Dessert Board. Happy haunting!